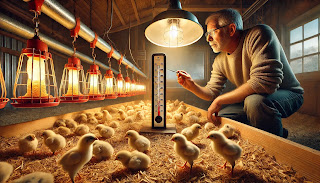
Maintaining the correct brooder temperature is one of the most critical factors in ensuring the healthy development of chicks. Since newly hatched chicks cannot regulate their body temperature, they rely entirely on external warmth to survive and grow. Failing to provide the right temperature can lead to stress, weakened immune systems, slow growth, and even mortality.
Whether you are raising chicks in a small backyard setup or a large-scale hatchery, proper temperature control in the brooder will set the foundation for a healthy, strong, and productive flock. In this guide, we’ll cover:
✅ Ideal brooder temperatures by week
✅ Best methods to provide warmth
✅ Signs of temperature-related stress in chicks
✅ How to adjust the brooder temperature as chicks grow
Let’s dive into the details!
Why Brooder Temperature is Essential for Chicks
Newly hatched chicks are extremely vulnerable to temperature fluctuations because:
🟢 Their bodies cannot regulate heat – Unlike adult chickens, chicks lack the ability to maintain body temperature.
🟢 Cold stress weakens immunity – Chicks that are too cold will have weakened immune systems, making them prone to diseases.
🟢 Overheating can cause dehydration – Excess heat leads to panting, dehydration, and heat stress, all of which can be fatal.
🟢 Proper warmth supports growth – The right temperature encourages strong bone development, good feather growth, and active feeding.
By ensuring the brooder is at the correct temperature, you help chicks develop into healthy, productive birds that will thrive in your poultry farm.
Ideal Brooder Temperatures for Chicks
Chicks require gradual temperature reduction as they grow and start developing feathers. Below is a recommended week-by-week brooder temperature guide:
| Week | Ideal Temperature |
|---|---|
| Week 1 | 95°F (35°C) |
| Week 2 | 90°F (32°C) |
| Week 3 | 85°F (29°C) |
| Week 4 | 80°F (27°C) |
| Week 5+ | Reduce gradually until chicks are fully feathered |
➡️ By Week 5 or 6, chicks should have enough feathers to regulate their own body heat, allowing them to transition to an outdoor coop.
Important: Sudden temperature drops can stress chicks, so always reduce heat gradually to avoid shocking their system.
How to Maintain Proper Brooder Temperature
To ensure chicks receive consistent warmth, follow these best practices:
1. Choose the Right Heat Source
✔ Heat Lamp (Infrared Bulb) – A 250-watt red infrared bulb is ideal for providing constant heat. It also reduces stress and prevents pecking among chicks.
✔ Heating Plate/Brooder Plate – These simulate a hen’s warmth and offer a safer, energy-efficient alternative to heat lamps.
✔ Ceramic Heat Emitter – This option emits heat without light, reducing disruptions to the chick’s natural day-night cycle.
2. Position the Heat Source Correctly
📌 Hang heat lamps 18–24 inches above the brooder floor to avoid overheating.
📌 Heating plates should be adjusted to allow chicks to move freely underneath.
📌 Always use a heat guard or cover to prevent direct contact with heat sources.
3. Use a Thermometer for Accurate Readings
✔ Place a thermometer at chick level to monitor temperature effectively.
✔ Measure in multiple areas of the brooder to ensure even heat distribution.
4. Monitor Chick Behavior for Temperature Clues
Chicks communicate their comfort level through their behavior. Observe them carefully:
🚨 Signs That Chicks Are TOO HOT:
❌ Panting or open-mouth breathing
❌ Wings spread away from the body
❌ Avoiding the heat source, crowding towards cooler areas
❌ Lethargy or excessive sleepiness
🚨 Signs That Chicks Are TOO COLD:
❌ Loud, constant chirping (distress calls)
❌ Huddling tightly together, often piling on top of each other
❌ Reduced movement and sluggishness
Ideal chick behavior: Chicks should be active, moving freely around the brooder, and resting comfortably under the heat source without huddling or avoiding it.
How to Adjust Brooder Temperature as Chicks Grow
Since chicks require less heat as they develop, follow these steps to gradually lower brooder temperature:
✔ Lower the wattage – Swap out high-wattage heat bulbs for lower wattage ones.
✔ Raise the heat lamp – Increase the height of heat lamps by a few inches each week.
✔ Reduce reliance on artificial heat – Open windows, allow natural airflow, and let chicks gradually adapt to ambient temperature.
⚠️ Never remove heat suddenly! If temperatures drop too fast, chicks can experience shock or stunted growth.
Common Brooder Temperature Issues & Solutions
Here are some common problems and how to fix them:
1. Chicks Are Crowding in One Corner (Away from Heat)
🔹 Possible Cause: The brooder is too hot.
✔ Solution: Raise the heat lamp or use a lower-wattage bulb.
2. Chicks Are Constantly Huddled Together
🔹 Possible Cause: The brooder is too cold.
✔ Solution: Lower the heat source or add an extra heat lamp.
3. Some Chicks Are Too Hot, While Others Are Too Cold
🔹 Possible Cause: Uneven heat distribution in the brooder.
✔ Solution: Use multiple heat sources or expand the brooder space to allow chicks to choose their comfort zone.
4. Chicks Are Pecking at Each Other
🔹 Possible Cause: Overcrowding or excessive light exposure from heat lamps.
✔ Solution: Use a red bulb instead of white light and increase brooder space.
Final Tips for Maintaining Healthy Brooder Conditions
✔ Provide fresh, clean water at all times – Dehydration happens quickly in overheated chicks.
✔ Ensure proper ventilation – A stuffy brooder can cause respiratory issues.
✔ Avoid sudden drafts – While ventilation is important, cold drafts can chill young chicks.
✔ Use a gradual transition period – Before moving chicks to an outdoor coop, let them spend a few hours per day in a cooler environment.
By carefully monitoring brooder temperature and adjusting conditions as chicks grow, you ensure a healthy, thriving flock that will lay high-quality eggs or grow into strong meat birds.
🐣 Healthy chicks lead to a productive poultry farm! 🐔
Stay tuned for more poultry care tips at PoultryHatch!

